Wall Hangings/ Gift items


Materials Required

Ice-cream sticks

Colours

Kundans and other decorative items

Old invitation cards

Fevicol

First decide on the shape and stick the icecream sticks accordingly. It can be square, triange, hexagon and so on.

Now colour the front portion and decorate it as desired.

Many old invitation cards have photos of gods on them. Keep the icecream sticks on the card and cut the shape according in the old card with the design in the centre, leaving 1/2 inch space extra.

Stick it on the backside of the ice cream stick frame.

This is the most simplest form. If you are good at drawing, you can draw your own design on some plain cardpaper and decorate that too as in the picture of Lord Venkateshwara (Balaji).

Another variation would be to make some roses and stick them in between.

In the end, attach a piece of thread behind the finished product for hanging it.


Flower Vase


Materials Required

Old cylindrical box...like that of lays chips
Colours, Brush
Mseal- one or two packs depending on the design
Plaster of Paris
Fevicol
Water

First make a paste of plaster of paris, fevicol and water and apply it on the box in an uneven manner.

Let it dry well.

Now mix the two parts of mseal well and make shapes to stick on the box. Use talcum powder or oil for convenience in shaping the mseal.

Let this also dry well.

Now colour the base and the remaining design in different contrasting colours for a bright look. Use water to spread the paint on the plaster of paris.

Your flower vase is ready.

Charcoal Painting


Materials Required


Charcoal Pencil

Thick chart paper

A good design to suit the painting


First trace out the design on the chart paper or draw some good design if you are good at it.


Draw thick lines on the design using charcoal pencil and using your finger, rub the outlines. Dont rub evenly throughout the picture...an uneven rub will give it a more natural look. A thicker line will give darker shade. Use a rubber to give a lighter shade.


Thats it, the charcoal painting is ready, a simple and quick one.


If you have the materials, one small painting will take less than half an hour to complete.

charcoal paintings, potrait painting, painting gallery, landscape paintings, abstract paintings, charcoal sketches, wall paintings,, charcoal painting technique, charcoal painting method, charcoal painting tutorial, charcoal painting designs, how to make charcoal painting, learn charcoal painting,

Other Types of Paintings

Affiliate of Ideas money, Inspirations for life, Easy indian food, Earn a Crore, Complaints

Nib Painting


Materials required


A good design
Black Felt Cloth
Oil colours
Nibs...straight and round nibs
Some hard base to work on

Although this painting will take more time to finish, the final effect will be wonderful.

First trace out the design on the black felt cloth.

Start colouring using oil colours and nib...cover every part of the design with the colours of your choice. Try to paint it evenly throughout the surface. Then, use the nib to create strokes on the colours, preferably from top to bottom.

The painting will take more than 10 days to dry...keep it in a safe place and the black felt might get dirty. To some extent the dirt on it can be removed using an old toothbrush.

After it dries well, the strokes will be more visible and the nib painting will be ready for framing.


Mirror Work Handbag


More of Mirror Work


Affiliate of Ideas money, Inspirations for life, Easy indian food, Earn a Crore, Complaints

Family Tree


Materials Required

Golden or silver colour wire

Hangings like golden leaves

Some beads


For a small tree, cut 24 pieces of the wire measuring 12 inches. Now, bend all of them together into half and twist it in the base (the fold). Now you will have 48 pieces of 6 inches each. The tree will be in three layers with 16 pieces each. Take two pieces, insert the bead or hanging in one of them and twist the wire. Now twist both the pieces of wire for about 1 cm and again insert bead or hanging, twist and go on till the end of the wire. Now bend the last bit of wire over the previous twist.


Repeat the same for another 14 pieces. Now you will have 8 branches. Twist the remaining wires once or twice. Again seperate 16 wires and follow the same procedure for the second layer. Repeat the process of twisting the wires again and finally for the top layer with 16 pieces.


Your family tree is ready. Place it on a flower vase...


It also serves as an excellent gift item and showpiece.


Affiliate of Ideas money, Inspirations for life, Easy indian food, Earn a Crore

Decorative showpieces


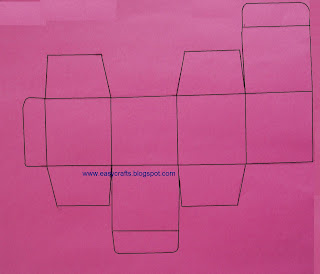
Decorative Boxes


Cut out pattern of boxes (first pattern is of trapezoid box and second for square box) in hard chart paper and stick at the places indicated.

Decorate them with colours, sequeins, mirrors and so on.

Affiliate of Ideas money, Inspirations for life, Easy indian food, Earn a Crore


Idols of gods and goddess in sandal colours are common and available easily outside temples.

Make the ones you purchase unique, by painting them using fabric colours.


Affiliate of Ideas money, Inspirations for life, Easy indian food, Earn a Crore

Jean Handbag


This bag is made from an old torn jean pant. I stitched it myself in the house so no costs were incurred..

Cut the two legs of the jeans into biggest possible rectangle and stitch it with a long piece of the jean on three sides of the rectangle. The last side, attach a zip. A long piece folded and stitched into half lengthwise was attached as the handle. The design is done by applique work method. As the jean can be torn anywhere, there is no particular measurement for this.

Sending this over to the Best of the waste event at Naarisakhi

Affiliate of Ideas money, Simple Indian Food, Inspirations for life, Easy indian food, Earn a Crore, Time Pass

Paper Bags


You can make perfect paper bags in ten minutes using handmade papers and decorate them in your own unique way to make it appear completely different from the ones available in the stores.

You need—

Handmade sheets
A big ruler
Scissors
Glue
Thick thread or ribbons (you can use the ones from the old and torn paper bags)
The two devices available in craft stores for making holes and attaching eyelets
Eyelets


First fold the sheet into half leaving around half an inch on one side. Now, fold the bigger part to half as in the figure 1. After folding, AB must be equal to CD.


Now using the big ruler, fold three sides of the sheet to the width of the ruler. Press it well on the front as well as back sides.

The fourth side must be folded on both sides for a little more width than that of the ruler. This will be the portion that will hold the thread. See figure 2, the red dotted line is the fold in the first step while the rest apply the steps above.


Glue that half inch fold well to the inner side and wait for it to dry.

Open the folds. For the two vertical sides, push the folded part inside exactly into half, pressing the folds properly. For the bottom, cut the four corners. Fold the opposite sides and glue them, placing the smaller sides below the larger sides.

Now fold the entire flap in the top portion inside the bag. Mark points to make holes, two on each side using the devices.

Attach handles using the thread or ribbons, inserting them in the holes.

Decorate your bag with sequins, beads, laces, cuttings from old greeting cards or use your painting skills to make it unique.

Affiliate of Ideas money, Inspirations for life, Easy indian food, Earn a Crore

Gift Envelopes


Also See..

More on Gift Envelopes

Artificial Jewellery Design


how to make artificial jewellery, homemade jewellery design, imitation jewellery design, handmade jewellery design, simple imitation jewellery, easy patterns for jewelry, fashion jewellery, kundan jewellery pattern, jewellery making, indian artificial jewellery, fashion accessories, beaded jewellery design, artificial kundan jewellery, designer fashion jewellery making, step by step instructions to make jewellery, different types of imitation jewellery, simple and nice gift item for girls, gift ideas for kids and fashion lovers


Also See...

Elephant hanging


Video tour

Google
Web easycrafts.blogspot.com
Related Posts Plugin for WordPress, Blogger...