Needle No 21 with thread size 40 is used for stitching leather.
Shaving Kit
Materials Required
20 cm tetron
Zip (Size No 5)- 60 cms
Runner-1
1.5 mtr piping wire
Repit-4
2mm cardboard piece of the size 3.5" x 22"
Cut the tetron in the following measurements-
Two pieces of 6" x 9"
One piece of 4.5" x 6"
One piece of 3.5" x 22"
Stitch the zip to the 3.5" x 22" tetron piece on one side.
Stitch the piping wire to the 6" x 9" piece to all sides.
Join the 4.5" x 6" piece to the 3.5" x 22" piece on one side. Insert the runner and stitch the other side as well.
Mark centers in the 6" x 9" piece and the above piece. Match and stitch both sides.
After covering cardboard piece with a cloth, attach it to the kit using repit.
Junior School Bag
Materials required
35 cm tetron
2.5 mtr nylon belt
2 lock buttons of steel
Thin piping belt-3 mtrs
2 rings of D shape
Repit-2
Cut the following pieces from the tetron
One piece of 12" x 15"
One piece of 8" x 12"
One piece of 7" x 14"
One piece of 3.5" x 28"
First leave around 2 " from one side of the piece measuring 3.5" x 28" and stitch the nylon belt after inserting the D-ring throughout and leave 2" in the other end also.
In the 7" x 14" piece, give a few stitches to both the sides leaving some space. Stitch the piping belt to one side.
Mark the center in this piece and the 8" x 12" piece. Match and stitch by folding the sides of the 7"x14" piece to half.
Stitch the belt piece throughout beginning from the centre.
Stitch the piping belt in the front side and the other three sides.
Now stitch the 12" x 15" piece to the other side of the nylon belt piece and stitch piping all over. Prior to stitching this piece, cut two nylon belt pieces of 18" measurement and attach it as in the figure below.

Insert the lock and fix the D-rings with repit.
Your Junior School Bag is ready.
Ladies Handbag
Materials required
35 cm foam leather
2 D-rings
Zip number 5- 1.25 mtr
Runners-5
Purse lining cloth- 35 cm
One magnet button
Cut the following pieces from the foam leather---
One piece measuring 2.5"x 40"
Four pieces measuring 7" x 11"
One piece measuring 3" x 11"
Two pieces measuring 2" x11"
Two pieces measuring 5" x 3"
Two pieces measuring 4.5" x 7"
Cut the following pieces from the lining material---
Four pieces of 6" x 11"
Two pieces of 12" x 7"
Two pieces of 4.5" x 7"
Firstly, cut the 3" x11" piece into half and stitch the zip.
Mark 1.5" frp, the piece measuring 4.5" x 7" and stitch the zip. Insert the runner and stitch the lining cloth to it, keeping upright(stitch must be on the right sides). Repeat for the second piece also.
Mark 0.5" in the 5"x 3"piece and cut from the centre of the piece to the corner to form a bow like shape. (Refer below figure)

Stitch the lining on the wrong side completely and give a cut in the centre of the lining for reversing the piece to the right side. Stitch the right side of the leather to make it stiff.
In the 40" piece, stitch the belt. First fold from both sides to center and double fold it.
Now, stitch the pieces as in the below figure.
 In all, six pieces of lining have to be attached.
While stitching lining, the stitch must always be on the zip, i.e. zip must be below the lining and not on the leather. Insert the runners and keep them in the center. Stitch on the upper side of the zip to make it stiff.
In the leftover two pieces measuring 7" x 11", cut one piece to the shape as below.
 Don't cut the second piece and stitch all sides leaving AB open.
Make a small hole in one piece and insert the magnet button. Fix it by inserting hand inside the pocket.Check where the piece meets the bag and fix the other portion of the button.
Attach it one of the 7" x11" piece, keeping it below the zipand stitch.Fold and stitch again, keeping the stitch on the leather and not on the lining material.
Fix the D-ring in the bow, fold and stitch on both sides of the center zip.Now stitch the lower ends of the 7" x 11" pieces together.(Don't stitch on the lining)
Mark centers in the pockets and sides of the bag and stich all the four sides, ensuring the right direction of the zips. Stitch only the leather pieces.
Now stitch all the sides of the lining cloth of the two side pocketsand attach them without any frills.
Make sure that you stitch only the leather portions.
Stitch only the two sides of the center pocket and leave the base open for reversing the bag.
Reverse the bag and stitch out the leftover base by folding it a little inside.
Attach the belt to the D-rings and fix it with repit on both sides.
Your handbag is ready.
Hand Purse
Materials required
18 cm foam leather
35 cm zip number 5
Runners-2
Zip number 3- 7" with runner
20 cm lining materials
1 magnet button
Cut the following pieces from the foam leather
Four pieces of 5" x 9"
Two pieces of 4" x 6"
One full length piece measuring 1.5"
Quilt two pieces of 5" x 9" and two pieces of 4" x 6".
Join both the quilted pieces in the bottom side. One plain piece measuring 9" x 5" is to be joined to the quilted piece.
Mark the two plain pieces as in the below figure...
 Fold the small pieces to half and stich on one side. Stitch the zip.
Attach the seperate piece of 9" x 12" with the lining piece. Stitch in the base on the wrong side.
Keep it on the quilted piece and stitch upside on the right side. Next, stitch the lining to quilted piece(keep upper stitch on leather).
Mark on the lining cloth as below and stitch the zip number 3.
Join all the pieces as follows......
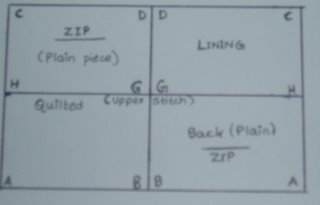
Stitch CD and reverse. Stitch on the wrong side. Give upper stitches to CD and also stitch GH (including the lining).
Join the sides to form a handpurse. Cut a long piece from the leather and give piping to the entire purse.
Your handpurse is ready.
Affiliate of Ideas Money, Inspirations for Life, Easy Indian Food


