Glass Painting


Materials required
Square or rectangle glass piece
Glass liner
Glass colors
Color palette
Fabric colours
Brushes

After cleaning the glass piece well, keep the design below the glass piece and start tracing the outline using the glass liner. Giving even pressure, press the outliner tube and stretch it to form the required shape.

Allow it to dry well and then start painting using the glass colors. Ensure there are no bubbles and the colour is spread evenly.

You can also decorate it with sequeins, beads or other decorative articles when the paint is wet. For the parts where you dont want the painting to shine- like face, hands, legs- paint it with fabric colours.

Alternatively, you can use m-seal (mix the two pastes provided well in equal quantity to get a clay like finishing and after it dries up, paint it in black) instead of the glass liners.

Apart from wall hangings, glass painting can be done on flower vases and other decorative pieces as well.
Once it dries well, frame it using crushed aluminum paper in the back side of the picture.

Other Types of Paintings

Leather Crafting

Needle No 21 with thread size 40 is used for stitching leather.


Shaving Kit

Materials Required

20 cm tetron
Zip (Size No 5)- 60 cms
Runner-1
1.5 mtr piping wire
Repit-4
2mm cardboard piece of the size 3.5" x 22"

Cut the tetron in the following measurements-

Two pieces of 6" x 9"
One piece of 4.5" x 6"
One piece of 3.5" x 22"

Stitch the zip to the 3.5" x 22" tetron piece on one side.

Stitch the piping wire to the 6" x 9" piece to all sides.

Join the 4.5" x 6" piece to the 3.5" x 22" piece on one side. Insert the runner and stitch the other side as well.

Mark centers in the 6" x 9" piece and the above piece. Match and stitch both sides.

After covering cardboard piece with a cloth, attach it to the kit using repit.


Junior School Bag

Materials required

35 cm tetron
2.5 mtr nylon belt
2 lock buttons of steel
Thin piping belt-3 mtrs
2 rings of D shape
Repit-2

Cut the following pieces from the tetron

One piece of 12" x 15"
One piece of 8" x 12"
One piece of 7" x 14"
One piece of 3.5" x 28"

First leave around 2 " from one side of the piece measuring 3.5" x 28" and stitch the nylon belt after inserting the D-ring throughout and leave 2" in the other end also.

In the 7" x 14" piece, give a few stitches to both the sides leaving some space. Stitch the piping belt to one side.

Mark the center in this piece and the 8" x 12" piece. Match and stitch by folding the sides of the 7"x14" piece to half.

Stitch the belt piece throughout beginning from the centre.

Stitch the piping belt in the front side and the other three sides.

Now stitch the 12" x 15" piece to the other side of the nylon belt piece and stitch piping all over. Prior to stitching this piece, cut two nylon belt pieces of 18" measurement and attach it as in the figure below.


Insert the lock and fix the D-rings with repit.


Your Junior School Bag is ready.


Ladies Handbag

Materials required

35 cm foam leather
2 D-rings
Zip number 5- 1.25 mtr
Runners-5
Purse lining cloth- 35 cm
One magnet button

Cut the following pieces from the foam leather---

One piece measuring 2.5"x 40"
Four pieces measuring 7" x 11"
One piece measuring 3" x 11"
Two pieces measuring 2" x11"
Two pieces measuring 5" x 3"
Two pieces measuring 4.5" x 7"

Cut the following pieces from the lining material---

Four pieces of 6" x 11"
Two pieces of 12" x 7"
Two pieces of 4.5" x 7"

Firstly, cut the 3" x11" piece into half and stitch the zip.

Mark 1.5" frp, the piece measuring 4.5" x 7" and stitch the zip. Insert the runner and stitch the lining cloth to it, keeping upright(stitch must be on the right sides). Repeat for the second piece also.

Mark 0.5" in the 5"x 3"piece and cut from the centre of the piece to the corner to form a bow like shape. (Refer below figure)


Stitch the lining on the wrong side completely and give a cut in the centre of the lining for reversing the piece to the right side. Stitch the right side of the leather to make it stiff.

In the 40" piece, stitch the belt. First fold from both sides to center and double fold it.

Now, stitch the pieces as in the below figure.


In all, six pieces of lining have to be attached.

While stitching lining, the stitch must always be on the zip, i.e. zip must be below the lining and not on the leather. Insert the runners and keep them in the center. Stitch on the upper side of the zip to make it stiff.

In the leftover two pieces measuring 7" x 11", cut one piece to the shape as below.


Don't cut the second piece and stitch all sides leaving AB open.

Make a small hole in one piece and insert the magnet button. Fix it by inserting hand inside the pocket.Check where the piece meets the bag and fix the other portion of the button.

Attach it one of the 7" x11" piece, keeping it below the zipand stitch.Fold and stitch again, keeping the stitch on the leather and not on the lining material.

Fix the D-ring in the bow, fold and stitch on both sides of the center zip.Now stitch the lower ends of the 7" x 11" pieces together.(Don't stitch on the lining)

Mark centers in the pockets and sides of the bag and stich all the four sides, ensuring the right direction of the zips. Stitch only the leather pieces.

Now stitch all the sides of the lining cloth of the two side pocketsand attach them without any frills.

Make sure that you stitch only the leather portions.

Stitch only the two sides of the center pocket and leave the base open for reversing the bag.

Reverse the bag and stitch out the leftover base by folding it a little inside.

Attach the belt to the D-rings and fix it with repit on both sides.

Your handbag is ready.


Hand Purse

Materials required

18 cm foam leather
35 cm zip number 5
Runners-2
Zip number 3- 7" with runner
20 cm lining materials
1 magnet button

Cut the following pieces from the foam leather

Four pieces of 5" x 9"
Two pieces of 4" x 6"
One full length piece measuring 1.5"

Quilt two pieces of 5" x 9" and two pieces of 4" x 6".

Join both the quilted pieces in the bottom side. One plain piece measuring 9" x 5" is to be joined to the quilted piece.

Mark the two plain pieces as in the below figure...


Fold the small pieces to half and stich on one side. Stitch the zip.

Attach the seperate piece of 9" x 12" with the lining piece. Stitch in the base on the wrong side.

Keep it on the quilted piece and stitch upside on the right side. Next, stitch the lining to quilted piece(keep upper stitch on leather).

Mark on the lining cloth as below and stitch the zip number 3.


Join all the pieces as follows......


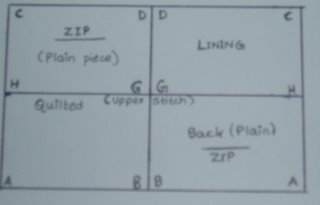
Stitch CD and reverse. Stitch on the wrong side. Give upper stitches to CD and also stitch GH (including the lining).


Join the sides to form a handpurse. Cut a long piece from the leather and give piping to the entire purse.


Your handpurse is ready.


Affiliate of Ideas Money, Inspirations for Life, Easy Indian Food

Photo Frames


Materials Required

Handmade Paper
Glue
Scissors
Thin plastic sheet
Embroidery Thread, Plastic mirrors or Rice or any other decorative items like sequeins etc

Firstly, cut from the handmade paper, two pieces of the desired shape for photo frames..it could be rectangle or any of the shapes as given in the photos.

For a 4” *6” snap, the frame must be of measurement 5.5” * 7.5”.

In one of the pieces, leave 2” from each side and cut out the centre portion.

Decorate the sides as desired. See figure below.


Stick the thin plastic sheet on the back side of this piece. Now stick the other piece with this piece for around ½” on ONLY three sides, leaving the fourth open.

Cut two small rectangle piece, stick them together and attach it to the frame from the back side to give support to the frame. Let it dry well.

Your photo frame is ready.

Gift Envelopes


Materials Required


Handmade paper

Double Sided Foam Tape

Fevicol or Glue

Laces, Sequeins and other decorative item


Cut two pieces of the shape given in the figure and a small rectangle piece to fit inside it.(that would serve as a pocket to keep the money).


Cut a small bit of the double sided foam tape and stick it on one side of the small rectangle piece in the inner portion.(the other side must be closed with the tape after the money is kept in the pocket)


Stick and fold at the mentioned places and decorate with sequeins, laces. Use your creativity to make it more attractive.You can even stick a rupee coin to give it a traditional look.

More on Gift Envelopes


Affiliate of Ideas Money, Inspirations for Life, Easy Indian Food

Greeting Card Embrodiery


Card Embroidery

Materials Required

Handmade Paper
Needle, Colour threads

Cut the handmade paper in the required size of greeting card or wall hanging.

Draw shapes like triangle, circle or any other shape as in the photos.

Start making holes using a needle in the lines at equal distance, with equal number of holes on each side in case of squares, triangles and rectangles. In case of circle, the number of holes must be in multiples of 2, 4 or 6 depending on the design required.

The following instructions are for a simple square design


Start from 1, pass the thread to 2. Bring the needle up again from 3 and insert the needle in 4, bring it up in 5 and insert in 6 and so on till u cover all four sides with each hole being pierced twice using thread.

You can use the same colour thread, or two colours for opposite directions as desired.

Finally stick some picture inside the gap or use it as a photo frame.

For a circle design, you have to first divide the total number of holes by 2/4/6 as desired and then start working on it.


Card Embrodiery Pattern

Affiliate of Ideas Money, Inspirations for Life, Easy Indian Food

Soft Toys


More on soft toys
Affiliate of Ideas Money, Inspirations for Life, Easy Indian Food

Rock Painting (Lord Ganesh)


Materials required

Rocks of various sizes and colors
Oil/fabric colors
00 Number brush
Sequeins, kundans for decoration

Firstly clean the rock well.

Draw or trace the desired picture on the rock using a pencil.

Paint the picture using oil colors.

Decorate with sequeins and kundans.

Affiliate of Ideas Money, Inspirations for Life, Easy Indian Food

Zardosi Painting (Lord Balaji)


Materials Required

Zardosi--available in different colors
Fevicol
Kundans and stones for decoration
Black chart or hardpaper

Trace out the desired picture on the chartpaper.

Apply fevicol on the lines and curves and stick the zardosi on the chartpaper, cutting the excess zardosi.

Complete the entire picture the same way.

Decorate with stones and kundans of various colors.

You can even paint the picture and later do the decorations.

Flower Vase


Materials Required

Cross-Stitch mats-3
Wollen balls---two contrasting colors
Gold beads-1 string
Crochet needle

Long stitches have to be put in one of the cross stitch mat (as shown in the pattern 1) and golden beads are to be stitched in the centre. For a standard size mat, four flowers in the first row and four in the second row can be done with a few columns spare for joining both sides of the mat.


Once these flowers are made on the mat, using a crochet needle, cover the upper and lower line of the mat and join the two vertical sides of the mat using normal running stitch.

Now, cut one mat into six equal squares and two more pieces of the same size from the third cross stitch mat. (Alternatively, you can make the vase with just six pieces also as in first picture)

Similar flowers like in the first mat have to be done in the two opposite corners, while the remaining two corners must have only three petals without golden beads. (Refer pattern 2) However, these flowers with three petals must be done on the wrong side of the cross stitch mat. Again, cover all the sides of piece using crochet needle. Join the two corners of the piece having three petals with a golden bead. Complete all eight square pieces in the similar manner.


Now, join the pieces one by one to the first mat, leaving eight squares in between two pieces. First stitch the upper and lower portions of the small pieces having flowers with four petals in the lower end of the first mat and the other end in two rows after the second row of flowers in the first mat.

Now, every two continuous small pieces attached to the mat must be joined using golden beads to form a complete flower of four petals like in the finished flower vase picture.

Cut a round piece in the remaining mat to fit the base of the vase and join it by way of running stitch.

Your beautiful flower vase is ready to decorate your homes.

More on Flower Vase


Affiliate of Ideas Money, Inspirations for Life, Easy Indian Food

Mural Works


Materials required….

Ceramic powder
Fevicol
Oil Colors and brush
A Carving or picture
Good laces, motifs for decoration
Wood piece of the desired size.

Mix ceramic powder with some fevicol and water to make a thick paste. Apply it on the wood base and stick the picture or carving of your choice on the board. When the ceramic powder is getting dried, use your finger to touch the wood base and lift your finger, doing the same all over the wood base makes small mounds of ceramic powder (giving it a 3 dimensional effect). Also, put up some paste in a cone and cut the tip of the cone. (Similar to the one made while applying henna or mehndi in hands). Use the cone to to decorate the wood base by making flowers, swastik, Om etc. Even wavy lines on the wood base with a 3D effect would look great. This is to be done quickly before the ceramic powder dries up. So, Plan everything first- right from deciding the place of carving to the decorations surrounding it. Let the wood base dry well for about 12 hours.

The choice is yours to paint the carving or let it remain in its natural form. Using oil colors, paint the entire wood base giving shading effects. Let it dry well. Decorate with motifs and laces using fevicol.

An ideal gift for various occasions.

Artificial Jewellery


Use your creativity to make your own unique fashion jewellery.

Materials needed-
Round nose pliers, side cutter pliers—tools available in craft shops
Jewellery thread, elastic, wires
Scissors
Small needles
A piece of soap
Beads and assorted materials as required
Glue

Use a double thread and insert it in the needle by joining the two ends using a little soap.

For necklaces first add one part of a hook and insert beads and assorted materials in the way you want your necklace to be and finally end it with the other end of the hook. Give a strong knot to the hook and cut the extra thread.

Put glue on both the ends where hooks are joined to the thread and let it dry well.

Make your matching earrings in the same way.

You can use wires to make round earrings or earrings of other shapes as shown in the picture.
Also See....
More on Jewellery
how to make artificial jewellery, homemade jewellery design, imitation jewellery design, handmade jewellery design, simple imitation jewellery, easy patterns for jewelry, fashion jewellery, kundan jewellery pattern, jewellery making, indian artificial jewellery, fashion accessories, beaded jewellery design, artificial kundan jewellery, designer fashion jewellery making, step by step instructions to make jewellery, different types of imitation jewellery, simple and nice gift item for girls, gift ideas for kids and fashion lovers

Fabric Painting


All that one needs for fabric painting is colors, brush and creativity….and your home will never be the same. You can paint everything from bedspreads, pillow covers, cushion covers, t-shirts, dress, sarees, dupatta, skirts, tops, curtains and many more to give yourself and your home a new look.

Use the best cloth for fabric painting. Try painting on the sample fabric first to check if it gives the desired appearance. Check if the fabric needs to be washed before painting. Painting a sample will help check this. Always iron the fabric before painting to get rid of the wrinkles. Synthetic and nylon brushes available in the market are the best choice with respect to brush.

Before painting, ensure that you keep some old newspapers or cloth below the fabric surface you are going to paint on to prevent the paint from spreading on the other side as in case of t-shirts, dress, pillow covers, cushion covers etc. After finish your work, always iron the fabric on the back side after 24 hours.

Apart from the normal way of painting by tracing the design on the fabric and painting using brush, fabric Painting can be done using several other things –

1) Sponge

Cut a small piece of sponge. Before beginning to paint using it, always dip the sponge well in water and then squeeze it to remove the excess water. Spread the paint on a saucer or palette and then dip the sponge in it. Don’t press too hard. Then start printing on the fabric. The best designs using sponge are of flowers. Keep separate pieces of sponge for different colors.

2) Cotton

Roll out a small piece of cotton in a ball. Dip it in water and squeeze out the excess water. Spread the paint on a saucer or palette and dip the cotton ball. Start printing it on the fabric. Flowers come out very well using cotton. Keep different cotton balls for each color.

3) Thread

Roll some thread between fingers and then crush them to a ball. Spread the paint on a saucer or palette and dip the thread in the form of a ball. Start printing it on the fabric. It is ideal for modern art form.

4) Cellotape

Cut a small piece of cellotape and dip in the palette having colors. Begin printing on the desired surface. The rough surface effect is different as compared to sponge, cotton and thread.

5) Vegetable

Potatoes and ladies finger are the most commonly used vegetables for printing. Ladies finger must be cut into half and then dipped in paint for printing. Flowers come out excellent in this method. Potatoes must be first cut into half. After drawing a design on it, a small blade must be used to carve out the shape. The printing procedure is same like that of ladies finger. Any kind of freehand shape can be carved on the potato.

6) Blocks

It is a very easy method in fabric painting. Wooden blocks are available in the market in various shapes and sizes. First place a small piece of sponge on a saucer, pour some paint on the sponge. Press the block on the sponge slightly and test if the paint has spread well by printing first on some waste paper or cloth. Practice will ensure uniformity in the print. After each print, dip the block in the paint and press again for the next print.

7) Stencil

This is simplest technique of fabric painting. Stencils are available in all craft material shops and can even be made easily. Place the stencil on the fabric to be painted and press well. If required, place some support on the corners of the stencil or use tape to fix it. Dip the brush in the paint and apply it in the relevant place using vertical and horizontal strokes. Ensure that the paint doesn’t go below the edge of the stencil. Slowly lift the stencil but lift the entire stencil at the same time. Repeat the procedure whenever the design is to be painted. Apart from brush, stencil painting can also be done using a small piece of sponge. It gives a completely different look to the fabric. Don’t forget to wash your stencil in warm water after you finish the day’s work to prevent paint from sticking in the corners of the stencil. Never fold your stencil. You can always practice first on rough sheets or fabric to get the right finish on the fabric. Store the stencil properly, it can be used several number of times.

Affiliate of
Ideas Money, Inspirations for Life, Easy Indian Food
how to do fabric painting, various stages of fabric painting, types of fabric painting, simple fabric painting methods at home, cloth painting techniques, using fabric colours, simple fabric painting method, fabric colours, how to do block printing, stencil printing painting, bedsheet painting, dress material painting, easy fabric painting ideas

Video tour

Google
Web easycrafts.blogspot.com
Related Posts Plugin for WordPress, Blogger...